How to Make Pixel Art for Kids: A 16x16 Grid Starter Guide
The average child spends over 7 hours a day on screens, yet less than 1% of that time is spent creating something they can actually own. They’re consuming, not building. That’s the problem. This pixel art tutorial for kids is the perfect antidote—a gateway to digital creation that’s simple, tangible, and teaches foundational skills that complex creative suites skip entirely. It turns a passive screen into a canvas.
This isn’t about becoming a professional artist overnight. It’s about giving a child the tools to make a character, animate a simple walk cycle, and hold the final file in their hands. The process builds patience, logical thinking, and a profound sense of accomplishment. Pixel art’s constrained grid teaches the fundamentals of digital art in a way no freeform drawing app can.
We’ve spent years watching the creative app space evolve, and one pattern stands out: the most powerful tools for kids are often the simplest. They’re the ones that work without an internet connection, don’t require a login, and export a real file to the device. The magic happens in the making, not in the cloud.
Why a 16x16 Canvas is the Best Pixel Art Tutorial for Kids
Every complex skill is built on simple foundations. For digital art, that foundation is understanding how screens build images from tiny squares of color: pixels. Starting with a massive, blank canvas is intimidating. Starting with a 16x16 grid is a solvable puzzle.
A 16x16 canvas offers the ideal constraints:
- Manageable Scope: 256 total pixels to consider. A child can complete a recognizable sprite in one sitting.
- Focus on Form: Forces decisions about shape and silhouette before getting lost in detail.
- Clear Scaling: Easy to see how doubling the canvas size (to 32x32) works, building intuitive understanding.
- Fast Results: Quick iteration means more experimentation and less frustration.
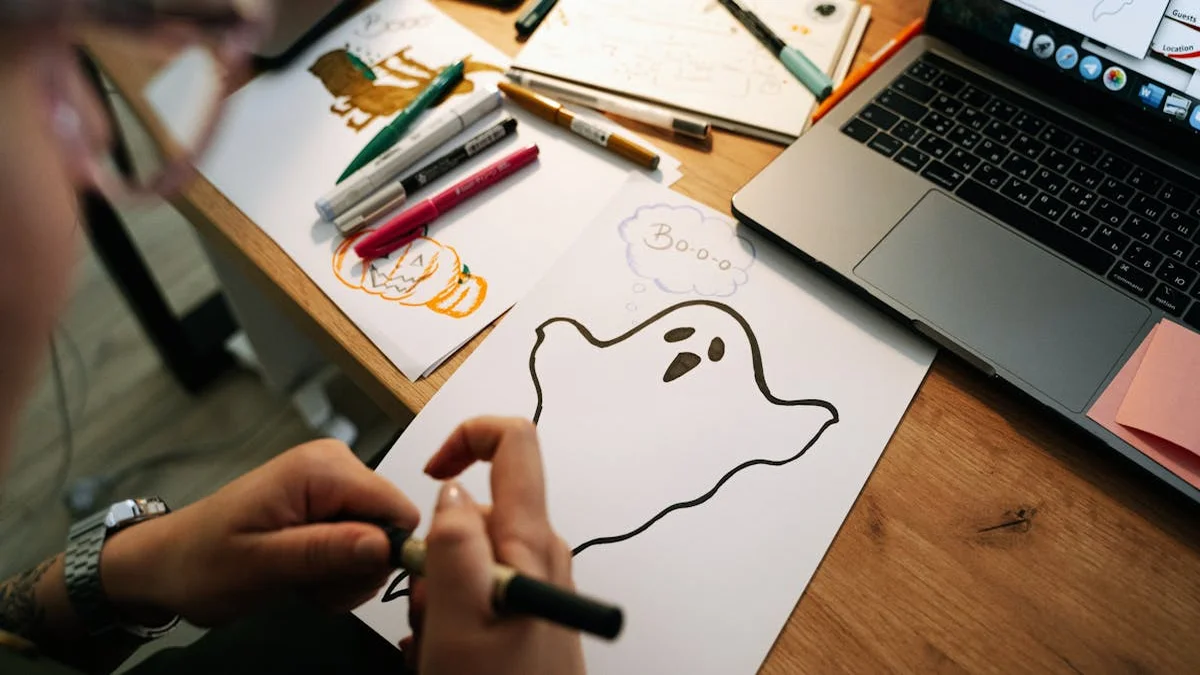
Think of it like learning to build with Lego bricks before trying to sculpt with clay. The grid provides the structure. The constraint of the grid isn’t a limitation; it’s the teacher. The first project should be iconic and simple—a heart, a star, a basic ghost, or a piece of fruit. The goal is a win.
Your First Sprite: A 6-Step Pixel Art Tutorial
Let’s create something concrete. You’ll need any app that lets you draw on a grid. Many are free. Look for one that lets you set a specific canvas size and choose colors from a palette.
- Set Up Your Workspace: Create a new file. Set the canvas dimensions to 16 pixels wide by 16 pixels tall. Turn on the grid view so you can see each square.
- Choose a Palette: Start with just 3-4 colors. For our ghost, we’ll need: a main color (like white or light blue), a darker shade for outlines/shadow, a color for eyes, and maybe an accent.
- Block the Silhouette: Using your main color, fill in the basic shape. For a classic ghost, think of a wavy bottom and a round top. Don’t worry about being perfect.
- Add Outline and Depth: Switch to your darker shade. Add a 1-pixel outline around your ghost, but only on the top and sides. Leave the wavy bottom open—this implies it’s floating. Add a few darker pixels on one side to suggest a light source.
- Create the Face: Using your eye color, place two pixels for eyes. Give it a simple expression. A straight line of two pixels can make a cute, neutral mouth.
- Final Polish: Zoom out. Look at it from a distance. Does it read as a ghost? Adjust a pixel or two. Add a tiny highlight in your main color to the eyes.
You’ve just made a game asset. That’s the key. This isn’t an abstract drawing; it’s a functional object. From here, you can animate it, create a friend for it, or export it and print it out.

How to Animate Your Pixel Art Sprite
A single sprite is a victory. Two sprites that create movement are pure magic. Animation demystifies the games and cartoons kids love. It shows them the mechanism behind the illusion.
The simplest animation is a two-frame loop. Let’s make our ghost float.
- Duplicate Your Sprite: Copy your 16x16 ghost to a new frame or canvas. This is Frame 2.
- Make a Subtle Change: In Frame 2, slightly adjust the wavy bottom of the ghost. Move the curves up by one pixel. You can also slightly shift the entire sprite up by a single pixel.
- Test the Loop: Flip between Frame 1 and Frame 2 quickly. You should see a gentle bobbing motion. This is the core principle of all animation: a sequence of slightly different images.
- Control the Speed: The speed of the animation is determined by how long each frame is displayed. Playing with this timing (100ms vs 500ms per frame) teaches pacing and mood.
“The moment a child sees their own drawing come to life through a two-frame animation is a foundational experience in digital literacy. It replaces mystery with methodology.”
This process—draw, duplicate, modify, test—is iterative logic. It’s basic programming thinking disguised as art. They’re building a sequence, debugging the visual result, and optimizing for clarity. Animation teaches patience and the power of incremental change.
What to Do With Your Finished Pixel Art
This is where most online creative platforms drop the ball. The project lives in an account, on a server, behind a login. For a kid, it might as well be in a black hole. The work needs to become a thing.
When you export your sprite sheet—a single image file containing all your frames—you get a real digital asset. Here’s what that file enables:
- Print It: Print the sprite sheet and use it as a coloring page, a pattern for perler beads, or a blueprint for a cardboard cutout.
- Share It Offline: Put the PNG file on a USB drive and give it to a friend. No accounts, no permissions required.
- Use It in a Real Project: That sprite sheet can be imported into simple, kid-friendly game maker tools. The ghost they drew can become the character they control.
- Build a Library: Save each sprite sheet to a dedicated folder on the device. Over time, they curate their own personal asset library—a portfolio they truly possess.
We believe creative tools should work offline by default. Creativity strikes in the back seat of the car or at a cabin with spotty Wi-Fi. The ability to open an app and create, then export a file directly to the device’s photo album, turns a digital toy into a genuine tool.
How to Pick the Right Pixel Art Tool for Your Child
The app store is flooded with options. Most are designed to keep a child engaged inside the app, not to empower them to create independent work. Use this checklist to cut through the noise.
- Does it require an account or login to save work? If yes, the child’s creations are tethered to a service that could vanish.
- Can it export a standard image file (PNG, JPG) directly to the device’s local storage? This is non-negotiable for tangible output.
- Does it work fully without an internet connection? Creativity shouldn’t be gatekept by Wi-Fi passwords.
- Is the interface simple enough that the tool itself doesn’t become the lesson? The focus should be on the art, not on navigating a complex UI.
- Are there clear, constrained starting points (like small canvas sizes) that prevent overwhelm?
- Does it avoid manipulative design? Look for absence of intrusive ads, nagging for ratings, or virtual currency systems for basic colors.
The Real Skills This Pixel Art Tutorial Builds
The long-term value isn’t just a collection of sprite sheets. It’s the cognitive framework being built. Pixel art teaches planning, iteration, and the relationship between effort and visible result. Each project reinforces:
- Spatial Reasoning: Understanding how shapes fit within a defined grid.
- Color Theory Basics: Learning how limited colors can create depth and light.
- Animation Logic: Grasping the principle of keyframes and tweening.
- Project Completion: The defined scope of a small sprite makes the concept of “finishing” achievable.
Most creative apps share a troubling assumption: that user data and creations are a byproduct to be stored and analyzed. Tools built for ownership operate on a different principle. The file is the goal. The app is just the workshop. When the workshop is simple, local, and focused, the creator—even a young one—is in charge.
The final measure of a creative tool is what exists after you close it. If all that remains is a memory of time spent, it’s entertainment. If a real, usable, shareable file exists on the device, it’s education. Start with a 16x16 grid, a few colors, and the project of making a friendly ghost. The skills they learn will scale far beyond the pixels. Give it a try this weekend and see what they create.